Custom Receipt Templates: How to Design Your Own Store Receipt
Need to create a receipt? Whether it's for replacing a lost one, tracking expenses, or personal use, designing a receipt is simple with the right tools. A well-structured receipt includes three key parts: the header (store details), the body (transaction details), and the footer (payment and notes). Tools like Receipt Generator offer templates tailored to various industries, making it easy to customize receipts for any purpose. Add your store's details, itemized transactions, and even upload a logo for a professional look. Plus, features like an AI-generated receipt photo can make your digital records look more realistic. Export your receipt as a PNG or PDF for easy storage or sharing. Stay organized and compliant with these straightforward steps.
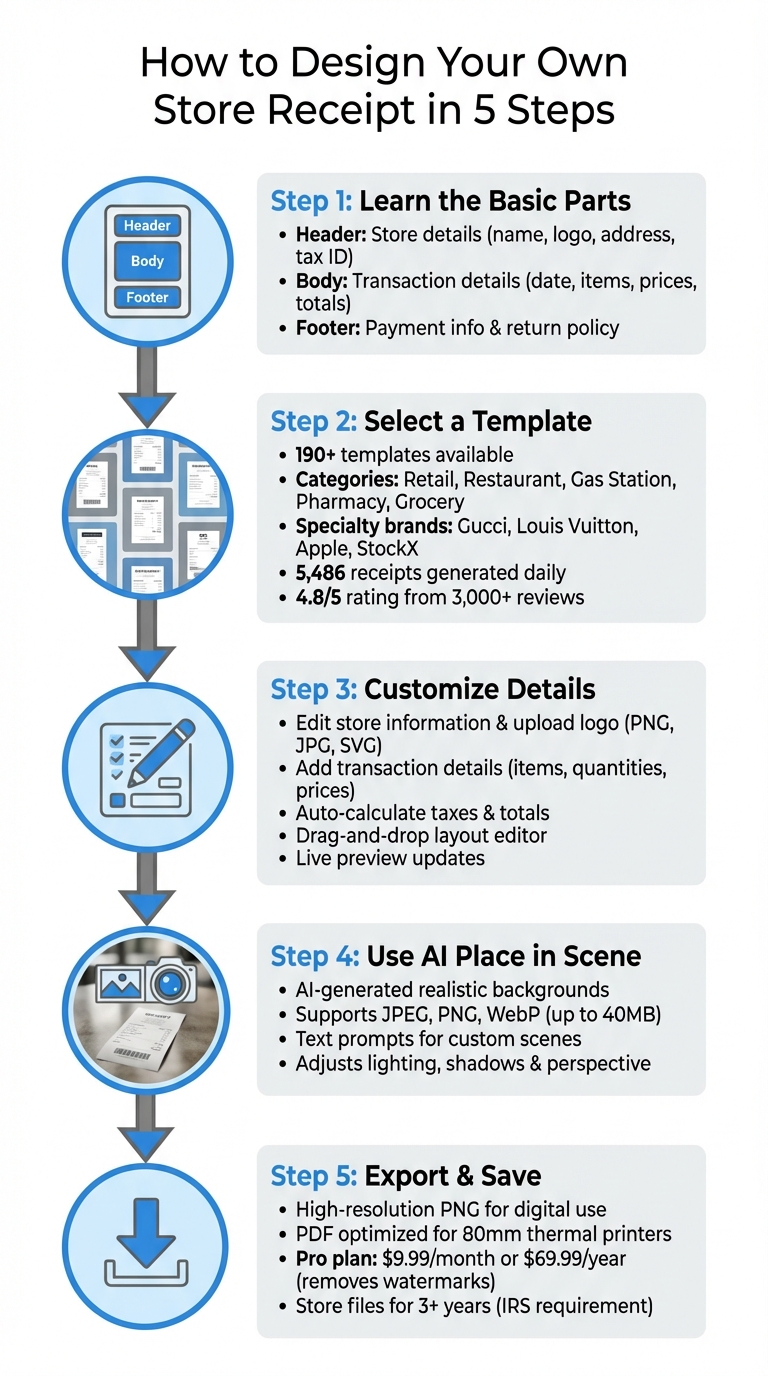
5-Step Process to Design Custom Store Receipts
Step 1: Learn the Basic Parts of a Store Receipt
A professional receipt design starts with understanding its three main components: the header, body, and footer. Most receipts in the US follow this structure. The header includes store details, the body outlines the transaction, and the footer provides payment information and additional notes. Getting these elements right ensures your receipt looks professional and trustworthy. Use the receipt template tool below to customize each section.
"A good receipt is more than just a slip of paper - it's your final handshake with a customer." - ReceiptMake
Header Section: Store Details
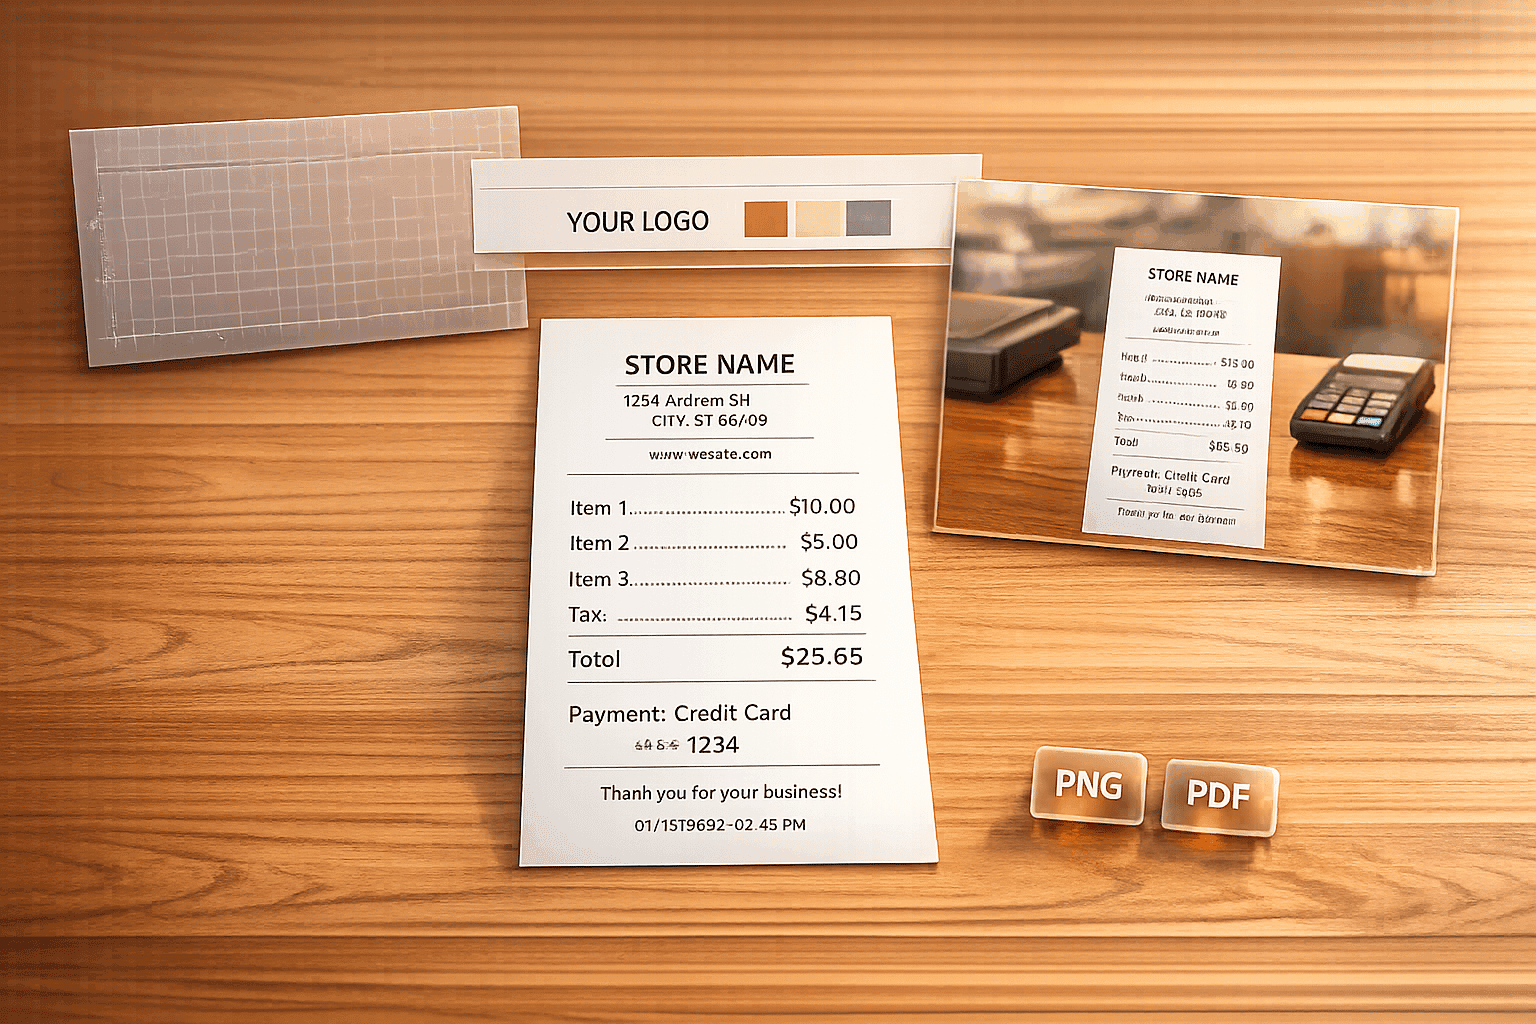
The header is where your business makes its first impression. Include your business name, logo, address, phone number, and website or email. For chain stores like Walmart or Target, this section often includes a store number or register ID. If your business collects sales tax, adding a Tax ID number is not only helpful but also reinforces compliance. Use bold or larger fonts for the store name and logo to ensure they stand out. Keep the design clean and within standard receipt dimensions.
Body Section: Transaction Details
This is the heart of the receipt, where the transaction details are outlined. Start with the date and time (MM/DD/YYYY format and 12-hour clock), along with a sequential receipt number. Then, provide an itemized list of purchases, including the item description, quantity, unit price, and line total. Adding unique IDs for transactions can help reduce fraud risks. After listing the items, show the subtotal, followed by sales tax as a separate line. If discounts apply, include them here, and ensure the grand total is prominently displayed in bold.
Footer Section: Payment and Notes
The footer wraps up the transaction and provides additional customer information. Clearly state the payment method - cash, credit card, debit card, or digital wallet. For card payments, include the card type (e.g., Visa, Mastercard) and only the last four digits of the card number to comply with the Fair and Accurate Credit Transactions Act (FACTA). For cash payments, note the amount tendered and the change provided. You can also include a card transaction code, return policy details (such as timeframes and conditions), and any thank-you messages or survey invitations. Adding QR codes for loyalty programs is another great touch. With return fraud costing US retailers over $18 billion in 2018, having clear and visible return policies protects both your business and your customers.
sbb-itb-2232899
Step 2: Select a Receipt Template in Receipt Generator
Once you’ve got a handle on the structure of a receipt, the next step is picking the right template. Receipt Generator offers over 190 templates designed to suit a variety of store types. You can browse the full collection by clicking either "Browse Templates" or "View All Templates" on the main dashboard. This setup makes it easy to find a design that matches your specific needs.
The templates are neatly categorized, so you can quickly locate what you’re looking for. Categories include Retail, Restaurant, Gas Station, Pharmacy, and Grocery. You’ll also find templates for well-known US brands, as well as specialized options for luxury fashion labels like Gucci, Louis Vuitton, and Dior, or for electronics retailers like Apple. Even niche platforms like sneaker resale sites StockX and GOAT are covered.
Each template is tailored to its industry. For instance, café receipts include tip lines, while auto repair receipts break down costs for parts and labor. The attention to detail extends to fonts and textures, which mimic real thermal receipt styles, giving your finished product an authentic appearance.
When choosing a template, make sure it aligns with your transaction type. For example, if you’re creating a retail receipt, select a template from the Retail category that includes essential fields like barcodes and tax details. You can use the live preview feature to double-check the layout before finalizing your design.
If you can’t find a perfect match, Receipt Generator’s support team can create a custom template for you. With a 4.8/5 rating from over 3,000 reviews and more than 5,486 receipts generated daily, this tool is a trusted resource. Once you’ve selected the ideal template, you’re ready to move on to customizing the receipt details.
Step 3: Customize Your Receipt Details
Once you've chosen a template, it's time to dive into the editing interface and make the receipt truly your own. Receipt Generator's block-based system makes this a breeze - just click on specific sections to update details, and watch changes appear in real time. Let’s start by personalizing your store information and logo.
Edit Store and Logo Information
Begin with the header section. Replace the placeholder text with your store's actual details. Click on the "Store Information" block to update fields like your business name, address, phone number, email, and website. If required, you can also include your Tax ID or business registration number to meet any local legal requirements.
To add a logo, click on the placeholder image and upload your file. Receipt Generator supports PNG, JPG, and SVG formats, automatically resizing your logo to fit perfectly while maintaining its proportions. For a more authentic thermal receipt appearance, consider converting your logo to black and white before uploading. Pairing it with thermal-style fonts like OCR-A or Epson can help replicate the look of traditional point-of-sale printers.
Once that's done, move on to the transaction details to complete the receipt.
Add Transaction-Specific Details
Now, focus on the body section where you can input transaction details. Click "Add Item" to create rows for product information, including the name, quantity, and unit price. The tool will automatically calculate totals, taxes, and the final amount, updating them instantly.
For payment information, choose the payment method from a dropdown menu (options include Cash, Credit Card, Debit Card, etc.). If you're recording a card transaction, there's a field to input the last four digits of the card number - this ensures compliance with data privacy regulations by avoiding the use of full card numbers. You can also specify the transaction date and time in the standard US format (e.g., 03/28/2026 at 2:45 PM).
Adjust Layout and Design
With the drag-and-drop editor, you can fine-tune your receipt's layout. Rearrange sections like the header, line items, payment details, or footer by simply dragging them into the desired order. You can also tweak font sizes for better readability, adjust spacing between elements, and even choose a paper texture to match your preferred receipt style, whether it's glossy, matte, or thermal.
For an extra touch of branding, use the color picker to modify text and background colors. To maintain a classic thermal receipt look, stick to black text on a white or light gray background. Don’t forget to customize the footer - this is a great spot to include return policies, warranty details, or even your social media links to encourage customer interaction. Every change you make is reflected in the live preview, so you can experiment and refine until the design feels just right.
Step 4: Use AI Place in Scene for Realistic Photos
Once you've designed your custom receipt, you can make it even more lifelike with Receipt Generator's AI Place in Scene feature. This tool transforms your digital receipt into a realistic photo by placing it on surfaces like a wooden desk or a marble countertop. The AI automatically adjusts details like lighting, shadows, and perspective, making the image look as though the receipt was printed and photographed.
To get started, click the "Place in Scene" button after finalizing your receipt design. You'll have two options: select from preset backgrounds or upload your own image. If you choose to upload, Receipt Generator supports JPEG, PNG, and WebP formats with file sizes up to 40MB. For the best results, use images with clean, uncluttered areas.
You can also create backgrounds using text prompts. Simply type something like "wooden table with coffee cup and laptop" or "white marble counter with office supplies", and the AI will generate a matching scene. Many users find this method quick and easy for creating personalized backgrounds.
This feature is particularly helpful for app mockups, portfolio presentations, and software testing. Developers often use these realistic images to test OCR (Optical Character Recognition) systems, as the added depth and texture simulate real-world conditions better than flat digital files. Once you're satisfied with the result, you can download the image as a high-resolution PNG, ready for printing or sharing online. With your receipt now looking like a real photo, you're all set to export and save your design.
Step 5: Export and Save Your Receipt
Once you're happy with your receipt design and details, it's time to download your file. Look for the "Download" or "Export" button near the preview canvas. Before saving, double-check the live preview to ensure all the key details - store information, transaction totals, taxes, and branding - are accurate.
Receipt Generator provides a high-resolution PNG file, perfect for digital use. This format ensures that barcodes and text remain crisp, no matter the zoom level. If you're printing or need the file for bookkeeping purposes, exporting as a PDF is a better option. The PDF is optimized for standard 80mm thermal printers, making it ideal for physical records.
The free version lets you create unlimited receipts, but files will include a small watermark. For professional use, consider upgrading to the Pro plan. At $9.99 per month or $69.99 per year, the Pro subscription removes watermarks and allows you to save custom templates for future use - perfect for client records or building a polished portfolio.
After downloading your receipt, take a moment to organize your files. The IRS advises keeping receipts for at least three years from the date you file your tax return. Digital copies are a reliable option, so consider storing your high-resolution PNG or PDF files in a cloud service like Google Drive or Dropbox. This makes it easy to access and share them with accountants or tax professionals when needed. With your receipt safely exported and stored, you're ready to move on to the Conclusion for additional tips.
Conclusion
Creating a custom receipt doesn’t require specialized design skills or advanced software. By organizing it into a clear structure - header, body, and footer - you can ensure it meets both legal requirements and customer needs. Templates make it easy to include key details, such as tax IDs and itemized transactions, which are crucial for accurate record-keeping.
Receipt Generator simplifies the entire process by allowing you to personalize store details and transaction information. Its built-in formulas handle tax and total calculations automatically, reducing the risk of manual errors. With this tool, you can produce polished receipts in just a few minutes.
Additionally, the AI Place in Scene feature takes things a step further by adding realistic, AI-generated placements for your receipts. Whether you’re managing bookkeeping, replacing lost records, or showcasing work for a portfolio, this platform helps you create professional results quickly and effortlessly.
FAQs
What details are legally required on a U.S. receipt?
When it comes to U.S. receipts, certain details are legally required to ensure transparency and compliance. These typically include:
- Retailer's Information: The name and business address of the retailer.
- Permit or Registration Details: The serial number of the retailer’s permit or registration.
- Purchaser's Information: The name and address of the buyer.
- Item Description: A clear description of the goods or services purchased.
- Payment Details: The total amount paid and the method of payment (e.g., cash, credit card).
Keep in mind, these requirements can differ slightly depending on the state, so it’s always a good idea to review local regulations for any additional specifics.
How can I make my receipt look like a real thermal printout?
To design a convincing thermal receipt, it's all about nailing the details. Start with the basics: a monochrome, high-contrast layout that mirrors the output of a thermal printer. Stick to a narrow, elongated format and use simple fonts that resemble those commonly found on receipts.
When it comes to colors, keep it straightforward with a black-and-white scheme. For added realism, incorporate a slightly textured background and apply a subtle grain effect to mimic the look of printed thermal paper.
Tools like Canva or Photoshop are perfect for customizing these elements. Remember to keep the design clean and skip any bright colors - authenticity lies in simplicity.
What’s the best format to export: PNG or PDF?
PDF is the go-to choice for professional, high-quality, print-ready receipts. It preserves the layout and design across all devices, making it ideal for official use or when you need a printable format.
PNG, on the other hand, is better suited for digital purposes, such as emailing or sharing receipts online. While it provides good image quality and is easy to view, it's not the best option for printing or formal documentation. Pick the format that aligns with your specific requirements.