7 Ways to Customize Your Digital Receipts
Digital receipts are more than just transaction records - they're an opportunity to strengthen your brand, improve customer trust, and even drive repeat business. By customizing receipts with branding, tailored messages, and practical details, you can turn them into tools that enhance customer experience and streamline operations.
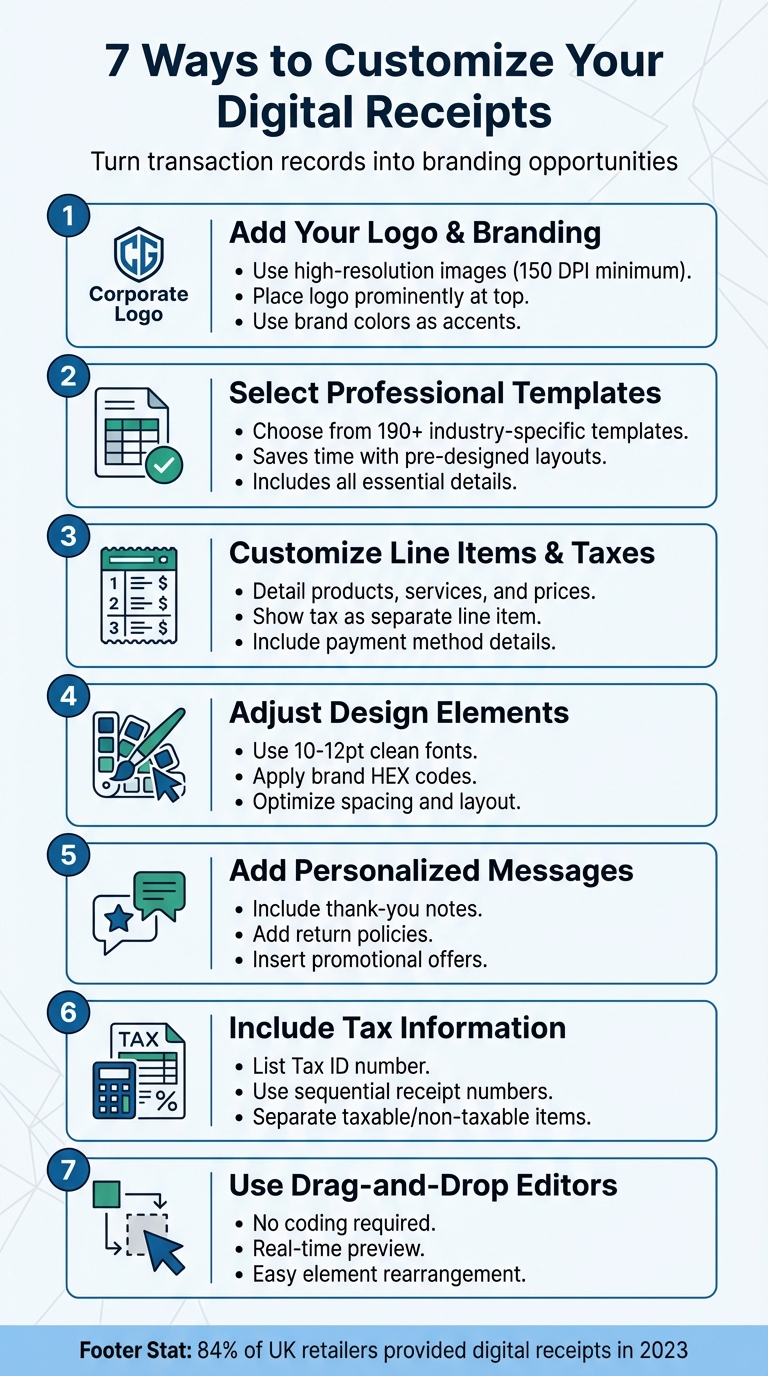
Here’s how to make your digital receipts stand out:
- Add your logo and branding: Use your logo, brand colors, and clean fonts to create a polished look.
- Choose professional templates: Pre-designed layouts save time and ensure all essential details are included.
- Detail line items and taxes: Clearly list products, services, and tax breakdowns to avoid confusion.
- Personalize messages: Include thank-you notes, return policies, and promotional offers.
- Optimize layout and design: Adjust fonts, colors, and spacing for readability and a professional appearance.
- Include payment and tax details: Ensure compliance with clear tax rates, payment methods, and transaction IDs.
- Use drag-and-drop tools: Simplify customization with user-friendly editors.
These steps help you create receipts that are functional, visually appealing, and aligned with your business goals.
7 Ways to Customize Digital Receipts for Better Customer Experience
1. Add Your Business Logo and Branding Elements
Your logo plays a key role in shaping the first impression of your receipt. Place it prominently - either in the top-left or top-center - for maximum visibility and impact.
Make sure to use a high-resolution image, ideally at least 150 DPI (1,280 x 648 pixels is a good benchmark). Stick to common formats like PNG, JPG, or SVG, and keep the file size below 512KB to ensure smooth rendering.
When incorporating brand colors, less is more. Use them as subtle accents - think headers, borders, or the "Amount Due" section - rather than overwhelming the entire receipt. To maintain consistency, rely on the exact hex codes from your brand guidelines. For the main body text, black on a white background ensures clarity and readability.
Typography also deserves attention. Opt for one or two clean, easy-to-read fonts like Helvetica, Arial, or Open Sans. Keep the body text size between 10–12pt for a professional look. Before finalizing, always test the receipt on both mobile and desktop to ensure it looks great across devices.
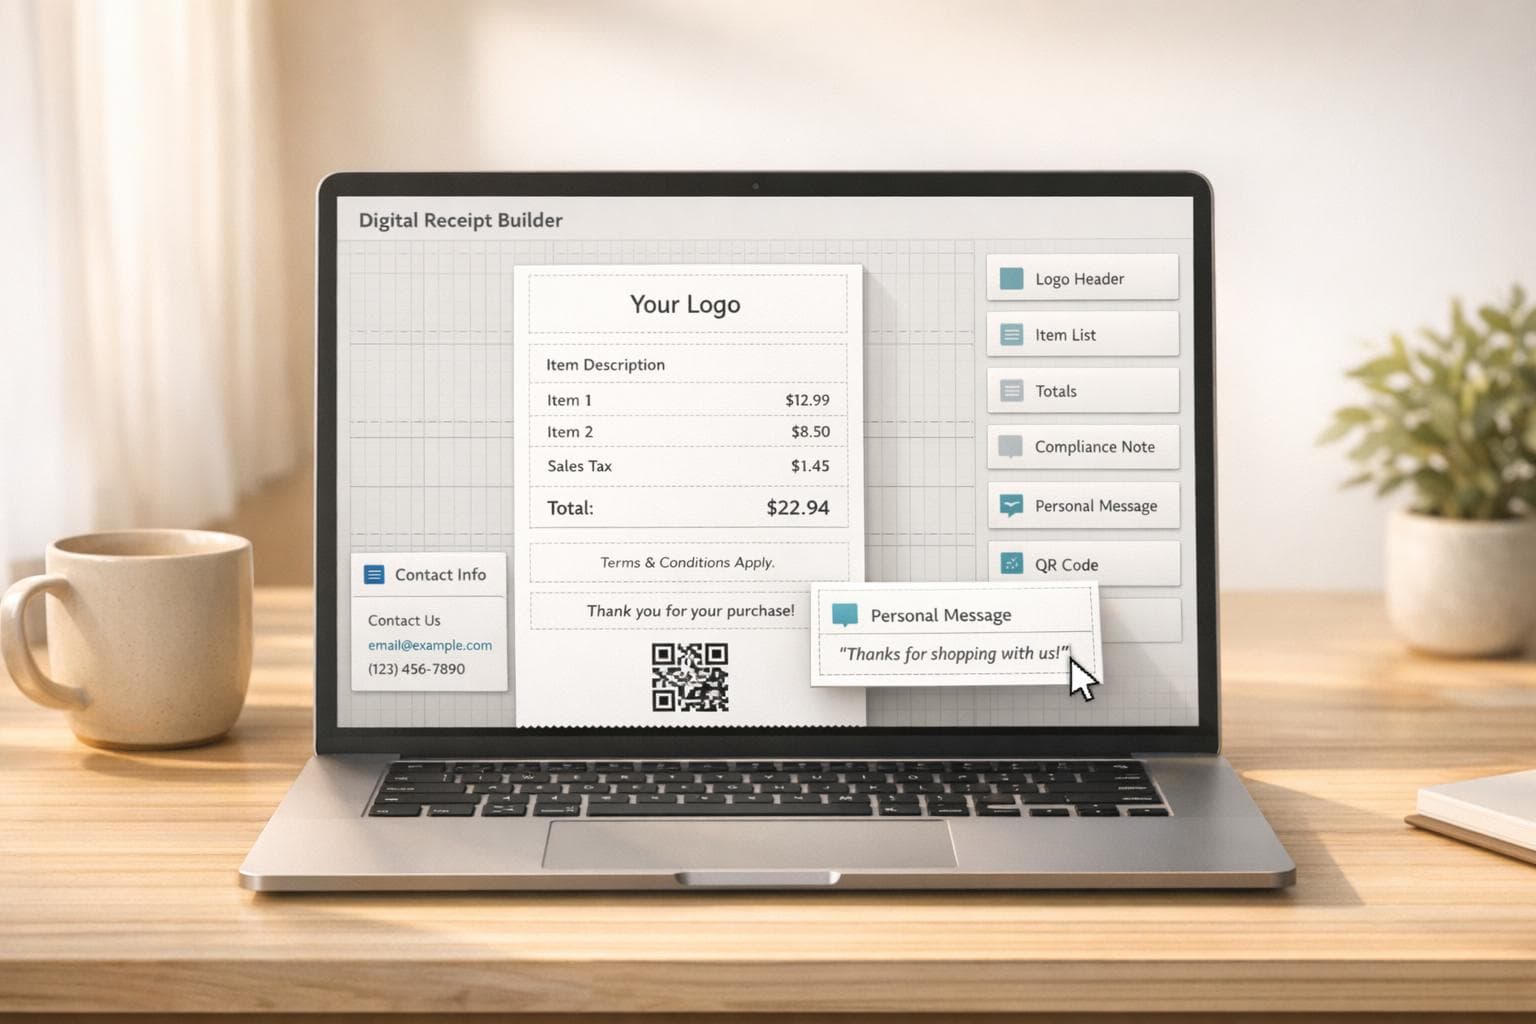
For a hassle-free experience, tools like Receipt Generator simplify the process. Its drag-and-drop editor lets you upload your logo, tweak colors with hex codes, and preview everything in real time.
sbb-itb-2232899
2. Select and Edit Professional Receipt Templates
Once you've created branded receipts, the next step is choosing the right template to enhance the customer experience.
Pre-designed templates offer a ready-to-use structure that includes all the essentials: business contact details, unique receipt numbers, itemized lists, subtotals, taxes, and payment methods. These templates save time and effort, especially for businesses without dedicated design teams.
For even more convenience, industry-specific templates are available. For instance, restaurant templates often feature tip lines and table numbers, while retail templates might include SKU fields and quantity columns. Platforms like Receipt Generator provide access to over 190 templates tailored to various industries, from cafes to boutiques to service businesses.
What makes templates especially useful is their adaptability. You can adjust layouts, switch between landscape and portrait formats, and even add interactive features like QR codes or feedback links. Many templates also support multiple currencies and languages, making them suitable for both local and international transactions. Always test your design on mobile and PDF formats to ensure usability.
Another advantage of pre-designed templates is built-in automation. Changes to line items or tax rates automatically update subtotals and totals, streamlining your workflow and ensuring accuracy for bookkeeping and tax purposes. Including a brief return policy in the footer can also reduce customer inquiries.
3. Customize Line Items, Prices, Taxes, and Payment Methods
Tailor transaction details to ensure your receipts accurately reflect every purchase and payment method.
Start with line items, which are the products or services listed on your receipt. Use editing tools to adjust columns and rename labels to better fit your business. For example, you might change "Product" to "Service." If you offer personalized options like extra toppings or custom requests, enable item modifiers for clear order verification. To keep receipts tidy, you can collapse identical items or group modifiers together.
Tax calculations are especially important for staying compliant with legal requirements. Always list sales tax as a separate line item rather than bundling it into the subtotal. Include your business's Employer Identification Number (EIN) or Tax Identification Number (TIN) on the receipt, and clearly specify the tax rate applied (e.g., 8.25%). As one expert advises:
Never bundle taxes or service fees into the subtotal. Listing them as distinct line items, ensuring both transparency and legal compliance.
The IRS recommends keeping copies of all issued receipts for at least three years, though some professionals suggest retaining them for up to seven years to account for various federal and state limitation periods.
For payment methods, provide clear details about how the transaction was completed. For credit card payments, include the card type and only the last four digits - federal law prohibits showing more than the last five digits to help prevent fraud. For cash payments, note the amount tendered and the change returned. For online payments, such as those made through PayPal or Apple Pay, include the transaction ID and payment status.
Automation can simplify these processes by instantly updating totals whenever adjustments are made. Modern receipt editors recalculate subtotals and totals automatically, reducing the risk of manual errors and ensuring accuracy for both customers and your records. Be sure to test your receipts on mobile devices to confirm that all adjustments - from item details to tax breakdowns - are displayed properly.
4. Adjust Fonts, Colors, Spacing, and Paper Texture
Once you've established your brand's core elements, it's time to fine-tune the visual aspects of your receipts to make them look polished and professional.
When it comes to typography, stick to the font standards you’ve already defined. Use clean, sans-serif fonts sized between 10–12pt for the body text, and steer clear of decorative fonts that could compromise readability. After finalizing your font choice, align it with your color scheme to reinforce brand consistency.
Colors play a subtle but important role in branding your receipts. Use your brand's HEX codes for accents like headers, section dividers, or the "Amount Due" field. However, keep the main body text black on a white background to ensure readability remains top-notch.
Spacing and layout are equally important for creating a clear and user-friendly receipt. Ample white space prevents the layout from feeling cramped, while bold text can draw attention to crucial details like the total amount or receipt number. Always test the final design on mobile devices to make sure it looks good across different screen sizes.
For background textures, you have some flexibility. Some businesses incorporate light watermarks or subtle paper-like textures to add personality to their receipts. Others opt for a clean, white background that emphasizes professionalism. Whichever route you choose, ensure the texture doesn’t interfere with text legibility.
5. Add Personalized Messages and Custom Text
A digital receipt can do more than just list totals - it’s a chance to connect with your customers on a deeper level. The footer, in particular, is a prime spot to share important information, express gratitude, and even encourage repeat visits.
Thank-you notes are a great way to show customers you care. A simple message like "Thanks for supporting our small business!" can leave a positive impression and make shoppers feel appreciated beyond their purchase.
Including return policies and warranty details on receipts is also practical. Since receipts are often the go-to document for returns, clear language - like "Returns accepted within 30 days with this receipt" - can help avoid misunderstandings and cut down on customer service inquiries. For example, after SumUp introduced a feature in April 2020 allowing merchants to customize receipt footers, their Italian support team saw receipt-related questions drop significantly - from 242 in January to just 36 in April.
Adding promotional text turns your receipt into a subtle marketing tool. For instance, including a message like "Show this receipt for $5 off your next purchase over $30" taps into the fact that 86% of consumers are influenced by coupons, potentially driving repeat business. QR codes are another option, offering links to surveys, social media pages, or newsletter sign-ups. One success story: In March 2026, Little Words Project linked in-store receipts to online customer data and saw a 20% increase in email sign-ups at checkout. These small, personalized touches can make your receipts not only functional but also a key part of your customer engagement strategy.
6. Include Tax Information and Itemized Lists
A proper digital receipt should include a detailed tax breakdown and an itemized list to comply with legal and record-keeping standards. Apart from the five states that don't impose sales tax, all other U.S. states require sales tax to be shown separately. Combining taxes into a single figure could lead to compliance issues, especially during audits.
Tax agencies expect receipts to clearly separate taxable and non-taxable items. This means each product or service should be listed individually with details such as description, quantity, unit price, and line total - following a "Quantity x Unit Price = Line Total" format. For retail businesses, adding Stock Keeping Units (SKUs) can make inventory tracking easier and streamline the return process. For service-based businesses, it’s important to separate labor charges from materials, specifying hourly rates and hours worked. This level of detail helps justify costs and minimizes the potential for disputes.
Another essential practice is using unique sequential receipt numbers (e.g., #001, #002). These numbers create a clear audit trail, as missing or skipped numbers can raise suspicion with tax authorities. The IRS advises keeping copies of receipts for at least three years after filing the relevant tax return - and for six years if income is underreported by more than 25%. Sequential numbering also supports automated calculations, which is covered in the next section.
Digital receipt tools can simplify this process by automatically calculating taxes based on pre-set rates for specific locations. This reduces the risk of manual errors and ensures accuracy. Including your Tax Identification Number (TIN) in the receipt header adds a professional touch and is often required for business-to-business transactions. For B2B dealings, including a Purchase Order (PO) number can further help your client’s accounting team reconcile records.
Digital receipts also have practical advantages - they don’t fade over time and make it easier to search for records during tax season. Considering the U.S. produces over 300 million pounds of receipt paper annually, switching to digital receipts not only ensures compliance but also supports environmental efforts.
7. Use Drag-and-Drop Editors for Layout Arrangement
Modern receipt tools make customization simple with drag-and-drop editors - no coding required. These user-friendly interfaces allow you to move around key receipt components like business names, logos, itemized tables, and payment details with just a few clicks. For instance, in March 2026, QuickBooks Online introduced an update to its customization interface, enabling users to rearrange receipt columns (such as Description, Quantity, and Rate) by dragging a "grid icon" to the desired position. This makes it easy for business owners to highlight the most important transaction details without hassle.
A real-time preview feature ensures you see changes instantly, so there’s no guesswork involved. Most platforms organize receipts into sections - Header, Body/Table, and Footer - allowing you to edit each part separately while keeping the overall layout intact. This setup combines ease of use with functional design, making customization efficient and straightforward.
Building on these design principles, tools like Shopify POS also offer visual editors for tweaking headers and footers. Beyond simply moving elements, these tools often include sliders to adjust column widths and toggles to show or hide specific fields (like tax IDs), giving you even more control. This level of flexibility helps you create receipts that not only reflect your brand but also remain clear and professional.
Conclusion
Customizing digital receipts transforms them from simple records into tools that boost branding and improve efficiency. By including elements like your logo, branded templates, detailed line items, personalized messages, tax details, and an intuitive layout, you can create receipts that are not only professional but also serve multiple purposes for your business. In 2023, 84% of retailers in the United Kingdom provided digital receipts to their customers, highlighting the growing popularity of this modern approach.
For businesses, these customizations lead to faster workflows, easier compliance tracking, and stronger customer relationships. Adding details like return policies, contact information, and promotional offers directly to receipts can also reduce the need for follow-up customer support.
For individuals, digital receipts offer practical advantages too. They solve the issue of fading thermal paper and simplify tax preparation with well-organized, searchable records.
Whether you're running a business or managing personal finances, these customization techniques ensure your receipts are polished, easy to understand, and highly functional - helping you stay ahead while keeping everything in order.
FAQs
What receipt details are legally required in the U.S.?
In the U.S., receipts are required to include several key details: the issuer's name or legal name, business address, tax identification number (EIN), a description of the product or service, unit price, total amount, date of issuance, and payment terms. These elements are essential to meet legal and tax regulations while offering transparency for both buyers and sellers.
How do I keep receipts compliant without showing sensitive card data?
To keep receipts compliant and protect sensitive card data, it's crucial not to include full card numbers or detailed payment information. Instead, show only the necessary transaction details, like the last four digits of the card. This method follows data security best practices and legal requirements, ensuring sensitive information stays protected while staying within compliance guidelines.
What should I put in the footer to boost repeat business?
Your digital receipt footer is more than just an afterthought - it’s a golden opportunity to connect with customers and encourage them to come back. Add a personal touch by including a thank-you message that shows genuine appreciation for their purchase.
You can also use this space to offer something extra, like a special promotion or a loyalty incentive. For instance, a discount code or a prompt to join your loyalty program can go a long way in building repeat business.
Don’t forget to align the footer with your branding. A friendly tone and a polished design not only leave a positive impression but also reinforce your brand identity. It’s a simple yet effective way to turn a routine receipt into a tool for customer retention.