How to Create a Professional Receipt Online
A good receipt should answer five questions fast: who sold it, what was sold, when it happened, how much was paid, and how the customer paid.
If I want a receipt that looks professional and holds up for taxes, returns, or recordkeeping, I keep it simple:
- Add full business details: name, address, phone, email, and logo
- Use a numbered receipt: like 001, 002, 003
- List each item clearly: quantity, description, unit price
- Show tax separately: don’t hide it in the total
- Include payment info: for cards, show only the last four digits
- Use U.S. formatting: $49.95, 06/15/2026, and comma separators like $1,200.00
- Check math before export: subtotal, discounts, tax, and final total
- Save files with clear names: like
2026-06-15-Receipt-1042.png
Here’s the short version: I gather the sale details first, choose the right template, fill in the business header and line items, review the totals, then export and file the receipt so I can find it later.
A few details make a big difference. The IRS accepts digital receipts when they are clear and accurate, and many records should be kept for at least 3 years. That means the receipt should not just look good - it should be easy to read, easy to search, and complete enough to use later.
If I’m making one receipt or setting up a repeat process, the goal is the same: clear records, clean formatting, and no missing details.
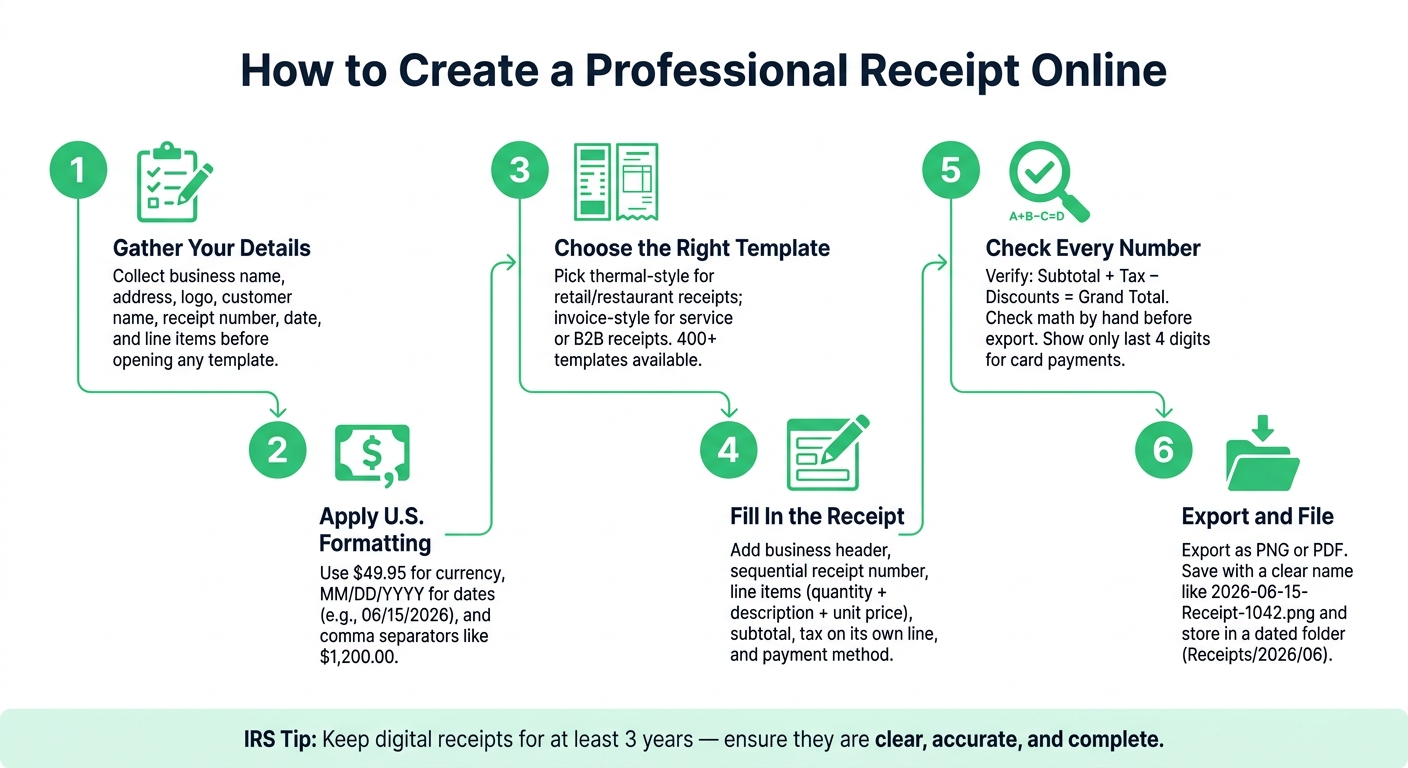
How to Create a Professional Receipt Online: Step-by-Step
Plan the Receipt Before You Build It Online
Get the details together before you open the template. It saves time, cuts down on mistakes, and helps you produce the right receipt on the first try. Once everything is in one place, filling out the template is much easier.
Gather the Business and Transaction Details You Need
Start with the basic business information the receipt needs to identify the sale. That usually includes your legal business name, street address, city, state, ZIP code, phone number, email, and logo file. Then pull together the transaction details: the customer's name, a receipt number like #00152, and the purchase date and time.
For line items, be specific. “2-hour plumbing repair - kitchen sink drain” gives the customer a clear record of what they paid for, while “Repair” doesn’t say much. You’ll also want each item’s quantity and unit price so the totals are easy to check.
Before you move on, confirm:
- Subtotal
- Discounts
- Sales tax
- Total
- Payment method
If the customer paid by card, record only the last four digits.
Apply U.S. Formatting from the Start
Small formatting errors can make a receipt look messy fast. For U.S. receipts, use $ for currency, periods for decimals, and commas for thousand separators. That means writing amounts like $49.95 and $1,200.00.
Dates should follow the MM/DD/YYYY format, such as 06/15/2026. It also helps to include the transaction time so the record is complete. If the receipt includes measurements, stick with U.S. customary units like pounds, gallons, or miles.
Sales tax should appear on its own line under the subtotal. A clean format looks like this:
Subtotal: $950.00 → Sales Tax (8%): $76.00 → Total: $1,026.00
Pick a Receipt Style That Fits the Transaction
The layout should match the type of sale. A compact thermal-style format works well for retail and restaurant receipts. A wider invoice-style layout makes more sense for service receipts with extra detail. For client-facing receipts, a clean layout with your logo at the top can look more polished.
No matter which style you use, keep descriptions left-aligned and prices right-aligned. That simple setup makes the receipt easier to scan, and the totals stand out right away.
With the details ready and the format set, you can drop everything into the template and generate the receipt.
sbb-itb-2232899
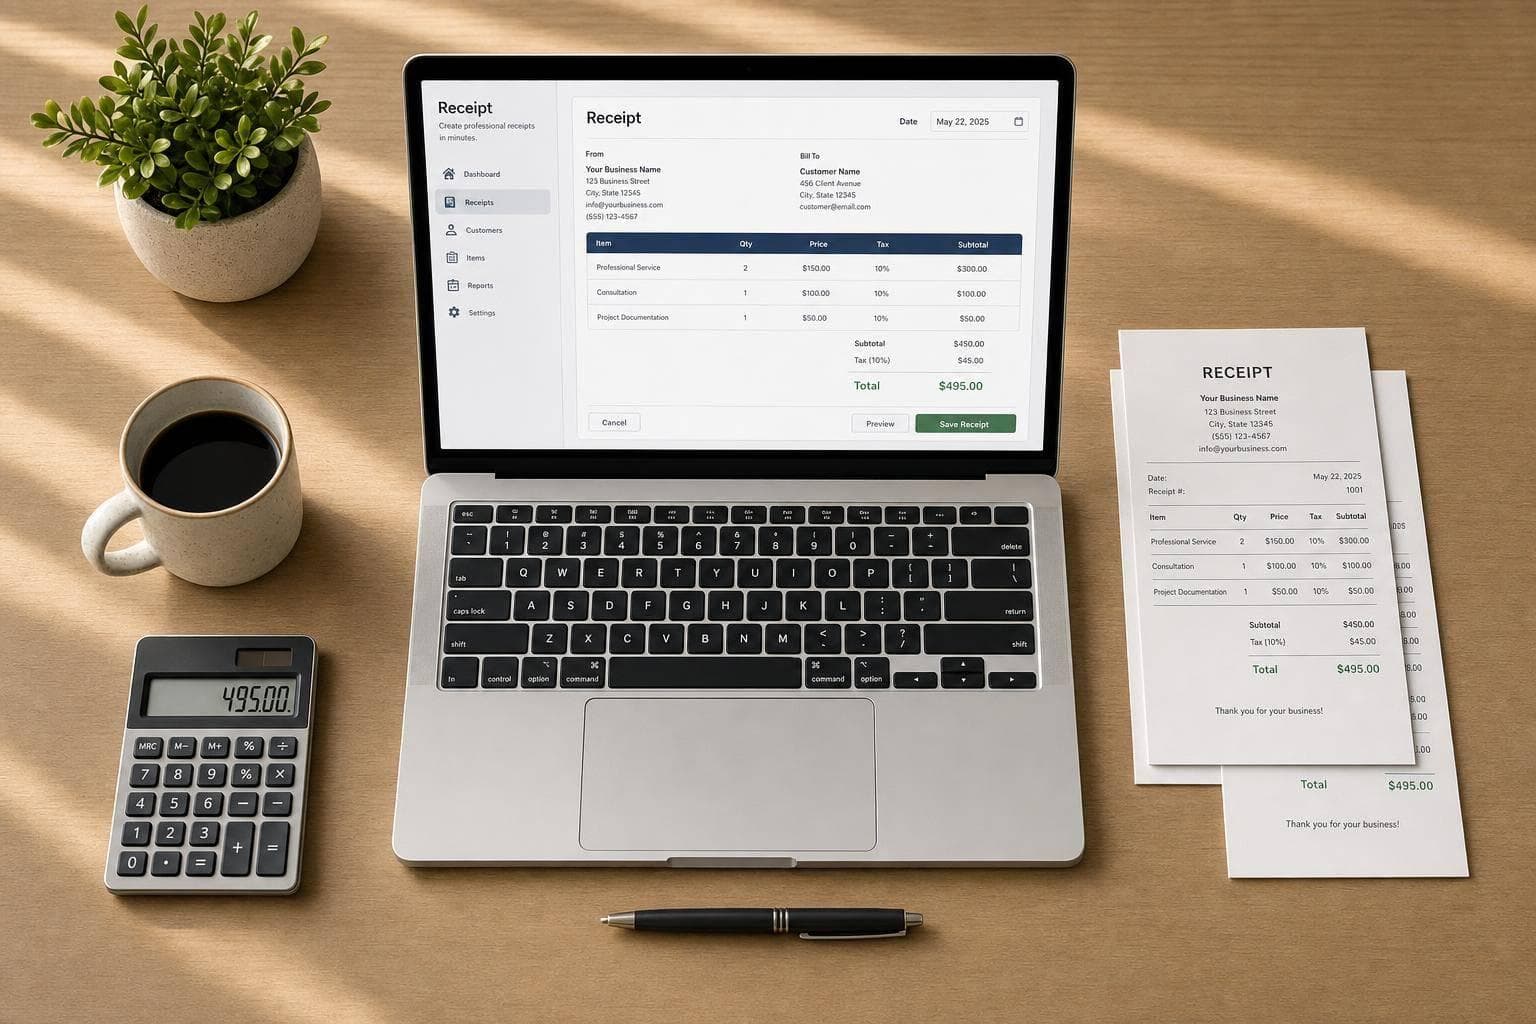
How to Build a Receipt in Receipt Generator

Start with a Template That Matches Your Receipt Type
Once you have your information ready, pick the template in Receipt Generator that comes closest to the receipt you need. The platform includes 400+ templates sorted by receipt type, industry, and format. That makes the first step pretty simple: start with the closest match instead of building from scratch.
For example, thermal layouts fit retail and restaurant receipts well. Full-page layouts make more sense for service and B2B receipts where you need extra detail.
Add Business Details, Line Items, Taxes, and Payment Info
Now fill in the receipt using the details you gathered earlier, and keep the same order as you go. It helps you move faster and cuts down on mistakes. Start with the business header, then add the receipt number, then the line items, and finish with totals and payment details.
Replace the placeholder store name with your legal business name. Add your address and contact details, then upload your logo. Receipt Generator supports PNG, JPG, and SVG files.
Next, enter the next sequential receipt number and set the date to MM/DD/YYYY. After that, add your line items. Each row should include:
- Quantity
- A clear description
- Unit price
Receipt Generator calculates line totals on its own, but you should still check every number by hand before exporting. A small unit price typo is easy to miss in the moment, and it's a lot easier to fix before the receipt goes out.
For the financial summary, enter the subtotal, apply the right jurisdiction-based sales tax rate as a separate line item, and include any discounts. Add the payment method last. If the customer paid by card, enter only the last four digits to help protect card data.
Adjust the Design and Export the Final File
Once the numbers are in place, clean up the look and export the file. Receipt Generator lets you change fonts, tweak spacing, and add color accents to table headers or divider lines. Those small design choices can make a plain receipt look much more polished.
For thermal-style receipts, fonts such as OCR-A or Epson help the layout look like a store receipt. For invoice-style receipts, Courier is easier to read and fits the typewriter-style look better.
Before you export, give everything one last pass. Check spelling, make sure the date and currency format are correct, and confirm that the layout is easy to read. Then export the file as a PNG. Save it with a steady naming format like 2026-06-15-Receipt-00249.png and place it in a dated folder.
If you need a lifelike mockup for a website, product page, or social post, use AI Place in Scene.
How to Make Receipts More Consistent and More Useful
Save Branded Templates for Repeat Use
After you export a receipt, save that layout and use it again. If a receipt already looks good, don't rebuild it from scratch every time.
Turn it into a branded template with your logo, business name, address, and contact details already in place. That way, each new receipt starts from the same base. Then you only need to change the line items, date, receipt number, and other transaction details.
Using the same logo, font, and layout across every receipt helps everything look uniform and professional.
Use AI Place in Scene to Create Realistic Receipt Images
If you're making visuals for presentations or marketing, AI Place in Scene can help. It drops your finished receipt into a lifelike setting, like a wooden desk, a marble counter, or even a background you upload yourself.
The end result looks like a photographed receipt, which makes it useful for mockups, slide decks, and social posts.
A small detail matters here: match the background to the type of receipt. A cafe counter fits a food receipt. A clean desk works better for a service receipt. That simple choice makes the image feel more natural.
Name and Store Receipt Files So They Are Easy to Search
File names matter more than most people think. A clear name makes it much easier to find the right receipt later.
Use a format like 2026-06-15-Receipt-1042.png. Then pair it with a simple folder setup, such as Receipts/2026/06. With that system, you can find a transaction fast when you're sorting records or getting ready for tax season.
Common Receipt Mistakes to Avoid and a Final Checklist
Missing Details, Vague Descriptions, and Tax Errors
Before you export, check for the mistakes that trip people up most often. In most cases, receipt issues come from the content, not the design. If a receipt is missing a receipt number, an exact date and time, or a clear business address, that can create tax and recordkeeping problems.
Vague line items cause a lot of confusion too. Be specific. Write something like "2-hour plumbing repair - kitchen sink drain" instead of "Service" or "Item." That small change makes the receipt much easier to understand later.
Tax mistakes are also common. Put sales tax on its own line instead of burying it in the total. Check that the tax rate matches your location, and make sure taxable items are separated from non-taxable ones. If the customer paid by card, the receipt should show only the last four digits of the card number - never the full number or the expiration date.
Formatting Problems That Reduce Readability
A receipt can include all the right details and still feel sloppy if the formatting is messy. Crooked columns, mixed currency styles, and tiny or decorative fonts make receipts harder to read and can hurt trust.
Bold the grand total. Keep the layout clean and the font easy to read. A simple cash sale may only need a basic layout. A service receipt or audit record usually needs more detail. And if you're handing the receipt to a client, branded formatting can help it look more polished.
Use this checklist before export:
- Business info: Name, address, phone, and email are current
- Receipt number: One of a kind and sequential, such as 001, 002, 003
- Date and time: Match the actual transaction timestamp
- Line items: Specific descriptions, correct quantities, and accurate unit prices
- Totals: Subtotal + tax + tip − discounts = grand total; check the math by hand
- Payment method: Listed correctly; card numbers show only the last four digits
- File export: Save as PDF for printing or PNG for digital use, with a clear file name like
YYYY-MM-DD_Receipt_1043.pdf
Conclusion: Build Receipts That Are Clear, Accurate, and Easy to Reuse
Creating a professional receipt online comes down to a few steady habits: collect the right details before you start, follow U.S. formatting rules, pick a template that fits the type of transaction, and check every number before export.
Use specific descriptions. Put tax on its own line. Keep the layout clean. Then store files with clear names and a folder system that makes sense, so you can find what you need without digging around.
A clear receipt helps protect your records and cuts down on avoidable disputes.
FAQs
Do I need a PDF or PNG receipt?
Not always, but for day-to-day work, it’s a smart move. PDF and PNG are both common formats for digital sharing, printing, and keeping records.
PDFs are usually the best choice when you want something more polished and ready to print, since they keep the layout clear and easy to read. PNG or JPEG files can also be a good fit for fast sharing or digital use.
What makes a receipt valid for taxes?
A receipt is valid for taxes when it clearly documents the transaction and acts as legal proof of purchase and income for tax records.
It should include:
- The date
- Itemized charges
- Sales tax listed separately
- The total amount paid
- Business information
How should I organize receipt files?
Save receipts in one dedicated folder, whether they’re for business or personal use. Sort them in a way that makes sense to you - by date, receipt number, or client name - so you can pull up the right file without digging around.
Stick to one file format when you can. PDF works well for recordkeeping and sharing, while PNG or JPEG are fine for image files. Use clear file names, back everything up on a regular basis, and keep a simple log or spreadsheet with the key details.