How to Make a Receipt for Your Small Business (No POS Needed)
Creating receipts for your small business doesn’t require a costly point-of-sale system. You can easily generate professional, compliant receipts using simple tools like online generators, Microsoft Excel, or Microsoft Word. Each method ensures your receipts meet U.S. standards, include all necessary details, and reflect your brand.
Key Takeaways:
- What to Include: Business name, contact details, unique receipt number, transaction date, itemized list, subtotal, tax, discounts, total, and payment method.
- Branding: Add your logo, use consistent colors, and include a thank-you note or return policy.
- Methods:
- Receipt Generator: Fastest option, offers templates, automatic calculations, and exportable PDFs.
- Microsoft Excel: Great for automating calculations and reusing templates.
- Microsoft Word: Ideal for fully customized designs with manual input.
Quick Comparison:
| Method | Speed | Features | Cost |
|---|---|---|---|
| Receipt Generator | Under 1 min | Templates, auto-calculations | Free |
| Microsoft Excel | 5–10 mins | Formulas, reusable templates | Free (with Office) |
| Microsoft Word | 5–10 mins | Customizable designs | Free (with Office) |
Choose the method that fits your needs and start creating professional receipts effortlessly.
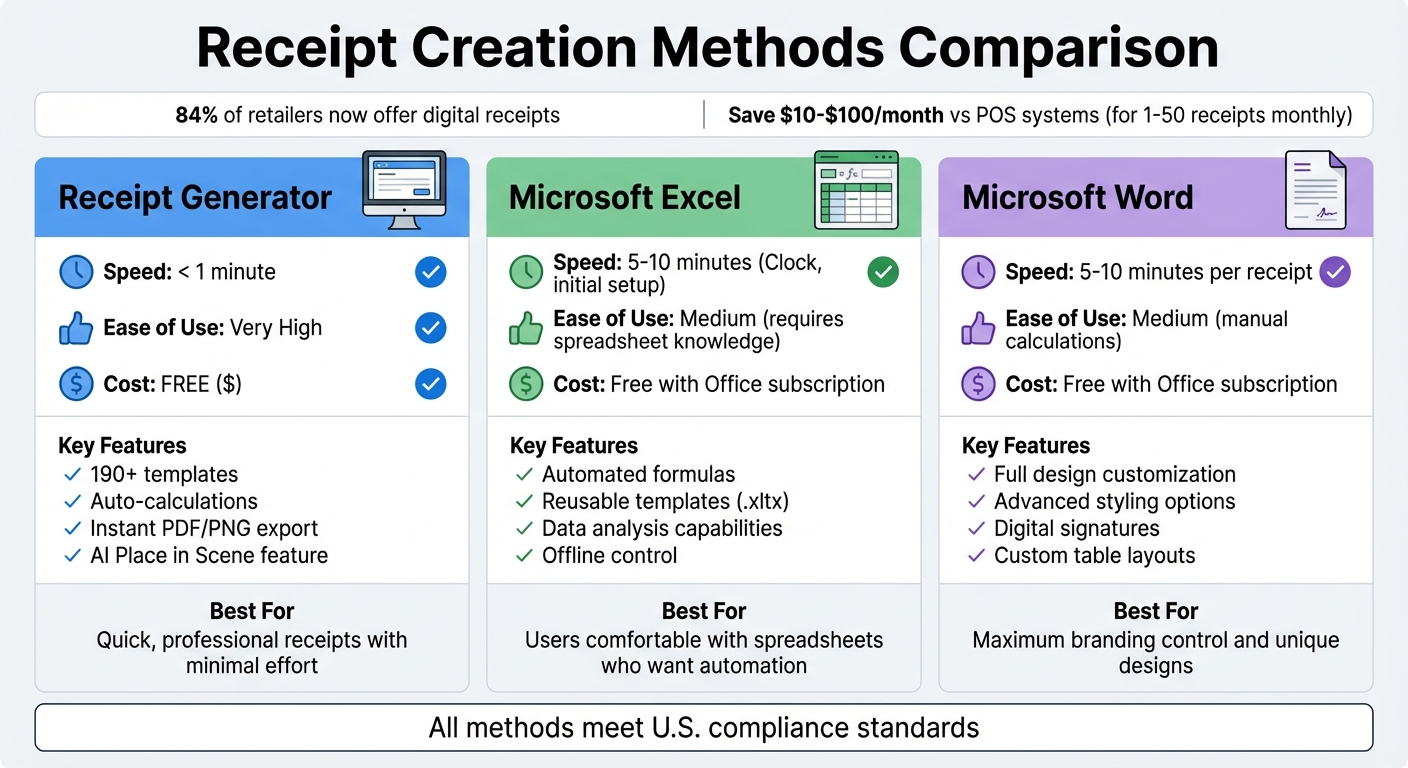
Comparison of 3 Receipt Creation Methods for Small Businesses
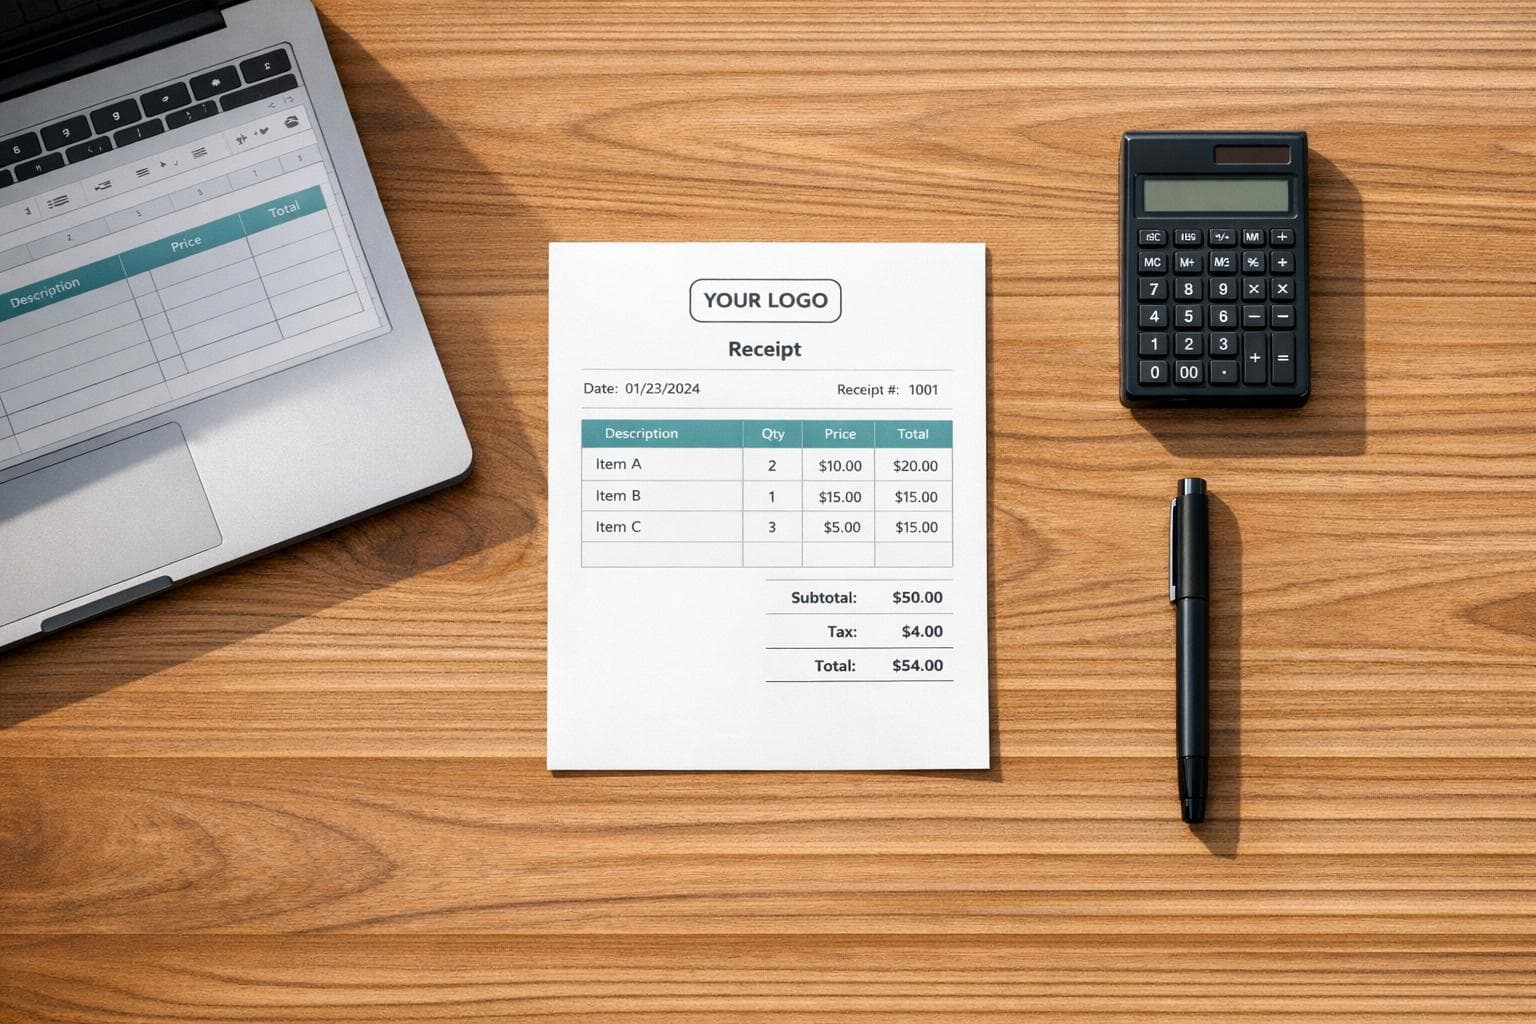
What Every Receipt Must Include
A receipt isn’t just a piece of paper; it’s a legal document that protects both your business and your customers. Getting the details right from the start can save you headaches during tax season and ensure you stay compliant with US regulations.
Required Information
To meet legal standards and serve as a proper financial record, every receipt must include some key details. Start with your legal business name (or DBA), along with your address, phone number, and email. This ensures your customers know exactly who they’re dealing with and how to contact you if needed.
Next, include transaction identifiers. Assign a unique, sequential number to each receipt and include the date and time of the transaction (formatted as MM/DD/YYYY, e.g., 03/28/2026 at 2:45 PM). These details are essential for creating an audit trail.
The itemized breakdown is where precision is crucial. List each product or service sold, including a brief description, quantity, and unit price. Then, clearly show the subtotal, sales tax (as a separate line), any discounts applied, and the final total in bold for clarity. Don’t forget to document the payment method: for card payments, note the last four digits and authorization code; for cash, include the amount tendered and any change given.
"A unique receipt number is your best friend if you ever face an audit or need to find a specific sale." - ReceiptMake
Beyond these essentials, your receipt should also reflect your brand’s personality and professionalism.
Branding Elements
Once you’ve covered the legal basics, think about how your receipts can strengthen your brand. A well-designed receipt doesn’t just document a transaction; it builds trust and leaves a lasting impression. Start by placing your business logo at the top of the receipt for instant recognition. Use brand-specific colors to highlight headers or key sections, and select fonts that match your overall style while remaining easy to read.
Include your full contact details - like your website, social media handles, and email address - to make your receipt a bridge that keeps customers connected to your business. Adding a small thank-you note, such as “Thank you for your business!” or a mention of your loyalty program, can turn a routine document into a relationship-building moment. The goal is consistency: your receipts should visually align with your website, storefront, and other customer-facing materials to create a unified, professional image.
sbb-itb-2232899
Method 1: Using Receipt Generator
Receipt Generator provides a quick and simple way to create polished receipts without the hassle of downloading software or setting up an account. With over 190 templates to choose from, it's perfect for freelancers, small businesses, or service providers. In just a minute, you can create a receipt that reflects your brand's identity. Here's how to get started.
Choosing and Customizing Templates
Start by picking a template style that aligns with your business's vibe. Options include:
- Minimal: Clean and modern design.
- Traditional: A classic thermal printer look.
- Modern: A sleek, card-style layout.
- Invoice: A formal, table-based format.
Once you've selected a template, fill in your business details - such as your name, address, phone number, email, and tax ID. Then, add the specifics of the transaction. List each product or service with detailed descriptions, quantities, and unit prices. The tool will automatically handle subtotals and taxes in USD, minimizing any chance of calculation errors.
For clarity, use precise descriptions like "Social Media Strategy Consulting (5 hours)." Assign unique, sequential receipt numbers (e.g., 001, 002, 003) to keep your records organized and audit-friendly. After customizing the essentials, you can move on to adding a personal touch with your logo.
Adding Your Logo and Exporting
Upload your logo in PNG, JPG, or SVG format, and the tool will resize it to fit perfectly. For the best result, use a transparent PNG. You can also add a personalized footer message, such as a "thank you" note or a return policy (e.g., "Returns accepted within 30 days with this receipt"). Preview your receipt in real time to ensure everything looks right, then export it as a high-resolution PNG, ready for digital sharing or printing.
Using the AI Place in Scene Feature
Take your receipts to the next level with Receipt Generator's AI Place in Scene feature. This tool creates photo-realistic mockups of your receipt in real-life settings. You can upload your own image or pick from preset scenes like a wooden desk, a marble countertop, or next to your products. The AI adjusts lighting, shadows, and perspective to make the mockup look authentic. This feature is perfect for professional presentations, social media posts, or client previews, offering a modern alternative to traditional POS systems while maintaining a high level of professionalism.
Method 2: Creating Receipts with Microsoft Excel

Microsoft Excel gives you complete offline control to design and customize receipts. If you're already familiar with Excel or have it installed, it's a great option for managing receipts efficiently. Plus, Excel's built-in formulas handle calculations for you, making it easier to avoid mistakes when adding up totals and taxes.
Using Pre-Made Templates
Start by opening Excel, then go to File > New and search for "Receipt" or "Invoice." You'll find a variety of templates with sections for your business name, customer details, itemized lists, and payment information. Choose one that fits your needs - whether it's a straightforward sales receipt or something more detailed.
Once you've picked a template, fill in the details for each transaction. Add the date (formatted as MM/DD/YYYY for US standards), a unique receipt number like INV-001 or REC-2026-001, and customer information if necessary. For each product or service, include the description, quantity, and unit price. Save your work as an Excel Template (*.xltx) so you can reuse the design. When creating a new receipt, just open the template to start fresh without altering the original. To give your receipt a cleaner, more professional look, remove gridlines by navigating to the View tab.
Setting Up Auto-Calculations
One of Excel's standout features is its ability to automate calculations. For example, you can use a formula like =B10*C10 to calculate the total for an item, then drag the fill handle to apply it to other rows.
To calculate the subtotal, use =SUM() for the item totals. Multiply the subtotal by the tax rate (e.g., =D16*0.08 for an 8% tax rate) and add it to the subtotal to get the grand total. These automated formulas reduce the chance of errors and ensure your receipts are accurate and professional.
"Implementing formulas for automatic tallies of subtotals, taxes, and total amounts due turns a humble spreadsheet into a dynamic billing tool" - John Michaloudis, Founder of MyExcelOnline
Adding Your Branding
Make your receipts stand out by incorporating your branding. Insert your logo at the top using Insert > Pictures. Use the Home tab to emphasize your business name by increasing the font size and bolding it. Highlight key sections like "RECEIPT" or "Grand Total" to make them pop. Apply your brand’s color scheme using the Fill Color and Font Color tools.
For currency formatting, select the relevant cells and format them as Currency to display the $ symbol and two decimal places automatically. Once your receipt is complete, save it as a PDF by going to File > Save As > PDF. This creates a polished, non-editable document that preserves your formatting and protects your calculations from accidental changes.
Excel provides a flexible and powerful way to create receipts, while also serving as a stepping stone to other methods like designing receipts in Microsoft Word.
Method 3: Designing Receipts in Microsoft Word
Microsoft Word is a great tool for creating professional-looking receipts with a personalized touch. While it doesn’t handle automatic calculations like Excel, it shines when it comes to creating polished, branded documents that are ready to print or share digitally.
Setting Up a Receipt Template
Start with a blank document. Set the page size to Letter (8.5 x 11 inches) and adjust the margins to Narrow. At the top of the page, insert your logo, followed by your business name and contact information.
The main part of the receipt will be structured using a table. Create a table with four columns: Item Description, Quantity, Unit Price, and Total. Above or below this table, add sections for important details like the Receipt Date, Receipt Number (e.g., REC-2026-001), Customer Name/Address, and Payment Method (Cash, Credit Card, or Check). While Word doesn’t calculate totals automatically, you can use its formula feature to sum up the values manually. When your template is complete, save it as a Word Template (.dotx), so you can reuse it without overwriting the original.
"The header is the first thing your client will see, so it needs to make a good impression." - Spencer Lanoue, Founder, Spell
This method offers a creative, design-focused alternative to Excel, giving you the flexibility to align the receipt’s style with your brand.
Formatting for US Standards
Once your template is set up, double-check that it aligns with US formatting standards. Use the MM/DD/YYYY format for dates to ensure consistency with business practices in the US. Add the dollar sign ($) before all amounts and align decimals for clear readability. Stick to professional fonts like Arial, Calibri, or Times New Roman, and use your brand’s colors for headers, borders, or text by utilizing the Font Color and Fill Color tools. Highlight key details with bold text to make the receipt easy to read and professional.
Exporting and Printing
When the receipt is finalized, save it as a PDF using File > Save As > PDF. This format locks in your design, preventing edits and ensuring the layout remains consistent across devices. For physical copies, print on High Quality settings using professional-grade paper to leave a good impression. If you need to print multiple receipts, keep blank templates handy for quick manual entry or on-demand printing.
This method in Word is a straightforward way to create branded, compliant receipts without needing a point-of-sale system.
| Receipt Component | Recommended Format | Word Tool |
|---|---|---|
| Page Size | Letter (8.5" x 11") | Layout > Size |
| Date | MM/DD/YYYY | Manual Entry |
| Currency | USD ($) | Manual Entry in Table |
| Final File | PDF (for sharing) | File > Save As > PDF |
Tips for Professional and Compliant Receipts
Creating professional receipts doesn’t have to be complicated. A few straightforward practices can ensure your receipts are legally compliant while also reinforcing your brand.
Keep Branding Consistent
Every receipt you issue should reflect your brand consistently - this means using the same logo, font, and color scheme across the board. This uniformity doesn’t just make your receipts look polished; it also helps build customer trust and strengthens brand recognition.
"Consistency isn't just for appearances. It creates an instant feeling of legitimacy and reliability, which is a massive advantage for any small business trying to hold its own against bigger competitors." - ReceiptMake Blog
Consistency also signals organized record-keeping, which is a big plus when tax season rolls around or if your records are ever audited.
Display Tax and Payment Details Correctly
When it comes to sales tax, transparency is key. Always show tax as a separate line item on the receipt. Many states require the tax rate to be clearly displayed, so include both the percentage and the dollar amount (e.g., "$2.50 (5% sales tax)"). Make sure the tax is calculated on the subtotal after applying any discounts, and show both the pre-tax and post-tax totals.
For payment details, be specific. If the customer pays with cash, record the amount tendered and any change given. For credit or debit card payments, include only the last four digits of the card number and the transaction authorization code. This not only protects customer data but also ensures compliance with privacy regulations like the CCPA.
"Always apply the discount first, then figure out the tax. This keeps your customers happy and your tax reporting accurate." - ReceiptMake Blog
Accuracy in tax and payment details is crucial, but the overall layout matters too. A clear, organized receipt is easier for both you and your customers to understand.
Preview Before Finalizing
Before you hit print or send a digital receipt, take a moment to review it. Ensure dates follow the MM/DD/YYYY format, currency amounts include the "$" symbol, and decimal points are properly aligned. If you’re printing, run a test copy to check that your logo is crisp and the fonts are easy to read. For digital receipts, always test the PDF on a mobile device to confirm it displays correctly on smaller screens.
These final checks might seem minor, but they go a long way in preventing errors and ensuring every receipt you issue looks polished and professional.
Comparing the 3 Methods
Each method has its own strengths depending on your priorities - whether it's speed, customization, or cost. Receipt Generator stands out for its speed, producing a professional receipt in under 60 seconds. This makes it a great option for small businesses with straightforward needs, as it automates calculations and creates audit-ready receipts. Microsoft Excel works well for users who are comfortable with spreadsheets. While it takes about 5–10 minutes to set up a reusable template, it’s a reliable choice for those who value built-in formulas and data analysis. On the other hand, Microsoft Word offers the most design flexibility, perfect for businesses looking to add unique branding elements, though it requires 5–10 minutes of manual effort per receipt. All three methods adhere to US standards and help maintain a professional image for your brand.
Comparison Table
Here’s a quick breakdown of how these methods compare:
| Method | Ease of Use | Realism | Cost | Key Features |
|---|---|---|---|---|
| Receipt Generator | Very High (<1 min, no signup) | High (Professional/Retail) | Free | Auto-calculations, 100+ templates, instant PDF/PNG export, AI Place in Scene |
| Microsoft Excel | Medium (5–10 min setup) | Medium | Free (with Office) | Reusable templates, built-in formulas, data analysis |
| Microsoft Word | Medium (5–10 min per receipt) | Medium-to-High | Free (with Office) | Digital signatures, advanced styling, customizable table layouts |
Receipt Generator is the fastest option, creating polished receipts in less than a minute, while Excel and Word require more manual input, typically taking 5–10 minutes per receipt. For businesses producing 1–50 receipts monthly, the free online tool offers excellent value, avoiding the $10–$100 monthly costs of accounting software or POS systems.
"Online Receipt Maker is the best for most people - it's free, fast, and designed specifically for receipts."
– Jessica Schüler, Content Marketer, Online Receipt Maker
If you already subscribe to Microsoft 365, Excel and Word come at no extra charge. However, if you’re starting fresh without any software subscriptions, Receipt Generator is a cost-effective solution that delivers professional results without requiring additional purchases.
Conclusion
Creating professional receipts for your small business doesn’t have to involve expensive hardware or complicated software. With the methods outlined here, you can generate audit-ready, branded receipts that meet U.S. standards and help build customer trust - all without additional costs or equipment.
This guide explored three practical options. Receipt Generator allows you to create polished receipts in under 60 seconds, with no account setup or recurring fees. For businesses issuing 1–50 receipts monthly, it’s a free solution that avoids the $10–$100 monthly costs of POS systems or accounting software. If you already use Microsoft 365, Excel and Word provide reliable alternatives, though they require a bit more setup. Each approach ensures your receipts meet U.S. standards while maintaining professionalism.
Whether you need quick results, enjoy working with spreadsheets, or want full control over the design, these methods help you keep accurate records for tax compliance, bookkeeping, and customer service. For a fast and easy start, try Receipt Generator to transform transaction details into a professional receipt in minutes.
With 84% of retailers now offering digital receipts, customers expect the same level of professionalism, no matter your business size. Pick a method and start creating receipts that reflect your business’s quality and attention to detail.
FAQs
Do I need to include the customer’s name on a receipt?
Including the customer’s name on a receipt is a smart move for both clarity and professionalism. It clearly identifies who the receipt belongs to, which is especially helpful in situations involving multiple customers or when detailed record-keeping is required. Plus, having the name on the receipt makes it simpler to reference or verify the transaction later if needed.
How long should I keep receipt records for taxes?
Keeping your receipt records organized is essential for tax purposes. As a general rule, hold onto them for at least three years. However, there are situations where longer retention is advisable. For instance, keep certain financial documents for seven years, or retain records for six years if you omitted income from your tax return. Always refer to the latest IRS guidelines to ensure you're meeting specific requirements.
What’s the safest way to show card payments on a receipt?
When printing receipts, it's crucial to prioritize security by never displaying full card numbers. Instead, include only the last four digits of the card and clearly state that the payment was made using a card. Additionally, always rely on secure, PCI-compliant payment processing systems to handle transactions. These measures not only protect sensitive customer data but also ensure your receipts maintain a professional and secure format.